 Last year I was installing a new system for a client who was very observant and possessed some surprising sprinkler savvy. She noticed that I was installing Netafim dripline in a small area on the same zone as some MP Rotators. She challenged me right away, correctly noting the design flaw of mixing sprinkler types of differing precipitation rates.
“Jeeze Louise! Where did this lady get all this sprinkler science already?” I asked myself. I found out later she had been reading The Crusty Sprinkler Guy blog. “Doh!”
So there I was, hoisted by my own petard, busted, and in need of an explanation. Every once in a while there will be a tricky little spot to water. In this case there was a small bed on the outside of a fence. What are our options?
Add a valve and make this little bed it’s own zone? Not worth the time and material. We’d have to add a valve, run new wire, add an extra module in the controller, run another lateral through a rockery. No way, José.
Put in heads with MP rotators off the zone on the other side of the fence? Well, no, because we’ll end up watering the street and the fence. This is a small narrow bed. The shortest radius on a rotator is about ten feet.
Okay, so the best way to irrigate this bed is with Netafim dripline. How do we make that work coming off the rotator zone? Let’s get those catalogs with the charts out of the truck, and we’ll look smart flopping them open on the hood. Hmmm, without putting out catch-cans and doing a tedious irrigation audit we can feel safe knowing the precip rate for rotators are 0.4 inches per hour. If you look at the chart that’s the consistent reoccuring number for almost all radii at square spacing. Now let’s look at our Netafim catalog. We have 12 different options in tubing. Three different dripper spacings and four different flow rates. Every Netafim catalog has a page with nifty formulas for calculating dripperline length, total zone flow, and precipitation rate.
But look at this! On page 6 they happened to have a label key with an example that has our answer in plain sight. This page explains the sticker labels that come taped to new rolls of tubing. The different colors mark flow, the different white shapes indicate spacing. On the backs of these labels are little graphs that cut to the chase telling you what your precip rate will be depending on how you space your rows, AND how many minutes it would take to apply 1/4″ of water. Killer!
Right here it says if we use .26 GPH tubing (gallons per hour) with 12″ dripper spacing, and space our rows 12″ apart we will get 0.42 inches per hour! That, my friend, is close enough for government work. We have matched the rate the rotators are putting out in the rest of the zone, and will not over- or underwater our small bed.
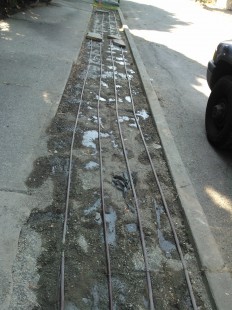
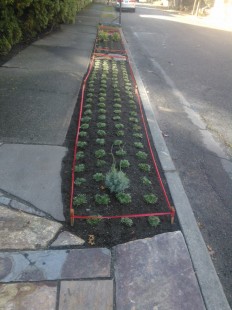
Here’s another example.  This long narrow parking strip was to be planted with ground cover. Our only option was to connect it with a shrub spray zone on the other side of the sidewalk. The number of strip spray-heads and gallonage needed to water this strip wasn’t feasible to add on the existing zone. Using 0.6 GPH Netafim spaced 11″ apart with 12″ dripper spacing we matched the 1 inch per hour rate the Toro Precision spray nozzles put out in the shrub zone.
 So you see, sometimes rules can be bent. It helps to flop open those charts on the hood of the truck, rub your chin, furrow those brows, and fool the client into thinking you’re smarter than you really are.


